
Did you know that families who craft together report 35% more shared laughter? Halloween is nearly here, so I say we ditch the store bought decorations and make some memories with easy and cheap DIY Halloween decorations kids can actually help create. This year, let us turn your house into a haunted mansion with some kids Halloween decorations. Get ready for some fantastic homemade decorations and prepare to be amazed!
Family crafting sessions are great for shared laughter, and these projects will keep everyone busy while making fun Halloween memories. Forget about spending a lot of money; these projects are budget friendly and fun!
Easy Spiderweb Decorations

Is it even Halloween without spiderwebs? Making your own is a simple and classic project. It only takes a little patience, string and scissors.
What you will need:
- Yarn or string (white, black or orange)
- Scissors
- Tape or glue
Instructions:
- Cut three long pieces of yarn.
- Tie them together in the center, making a six pointed star shape.
- Starting from the center, weave the yarn around each spoke moving outward.
- For stability, secure the intersections with tape or glue.
- Hang that spooky spiderweb! Try a doorway, window or the porch.
Tip: Add plastic spiders to make it extra spooky.
Ghostly Garland: Simple Decorations
Garlands immediately make a space more festive. Making a ghostly garland is especially easy, even for younger children. This is a great activity for everyone.
What you will need:
- White felt or paper
- Scissors
- Black marker
- String or yarn
- Glue or tape
Instructions:
- Cut ghost shapes from white felt or paper. Be creative with the shapes and sizes.
- Use the black marker to draw spooky faces on each ghost.
- Attach the ghosts to the string or yarn with glue or tape.
- Hang your ghostly garland across a mantel, doorway or window.
Variation: For a brighter garland, use different paper colors or add glitter for some sparkle.
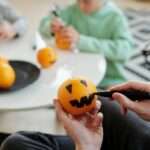
Pumpkin Painting: A Classic Activity

Why carve pumpkins when you can paint them? It is less messy and safer, especially for younger children. This lets children use their artistic skills in a fun way. Use smaller gourds for the youngest artists. Larger pumpkins work better for older children because they can make more detailed designs.
What you will need:
- Pumpkins (any size)
- Acrylic paints
- Paintbrushes
- Newspaper or a drop cloth
Instructions:
- Cover the work area with newspaper or a protective drop cloth.
- Let the children paint their pumpkins using their favorite Halloween colors and patterns.
- Let the paint dry completely.
- Show off the painted pumpkins! Try the porch, windowsill or as a centerpiece.
Design Ideas:
- Classic Jack o’ lantern faces
- Spooky ghosts
- Creepy spiders
- Colorful patterns
Mummy Jars: Spooky Decorations

Turn old jars into mummy containers. These are perfect for holding treats, small toys or party favors.
What you will need:
- Glass jars (any size)
- White crepe paper or gauze
- Googly eyes
- Glue
- Scissors
Instructions:
- Cut the crepe paper or gauze into strips.
- To look like a mummy, glue the strips around each jar, overlapping slightly.
- Stick the googly eyes on securely.
- Let the glue dry.
- Fill the mummy jars with treats and goodies.
Variation: For a more rustic look, use brown paper bags instead of jars.
Paper Plate Masks: Quick and Easy
Need a last minute costume idea? Paper plate masks are fast, easy and cheap. The design options are endless: ghosts, pumpkins, bats or whatever else the child imagines.
What you will need:
- Paper plates
- Scissors
- Elastic string or yarn
- Paint, markers or crayons
- Glue
- Extra decorative materials (feathers, glitter etc.)
Instructions:
- Cut eye holes in the paper plate.
- Decorate the plate with paint, markers or crayons to create the mask design.
- Glue on any extra decorations, like feathers or glitter.
- On opposite sides of the plate, poke holes and tie elastic string or yarn to use as a strap.
- Let the glue dry well.
- Wear the paper plate mask for a fun and festive Halloween look.
Mask Ideas:
- Pumpkin face
- Ghostly apparition
- Scary bat
- Witch’s hat
Handprint Ghosts: A Special Memory
With these handprint ghosts, you can capture your child’s handprints in a spooky but sweet way. This craft is a heartwarming reminder of younger years. These DIY Halloween decorations kids will cherish.
What you will need:
- Black construction paper
- White paint
- Paintbrush
- Black marker
Instructions:
- Cover the child’s hand with white paint.
- Press the painted hand firmly onto the black construction paper.
- Let the paint dry completely.
- Draw spooky ghost faces on the handprints using the black marker.
- Show off the handprint ghosts on the refrigerator, in a frame or as part of a collage.
Tip: Add a personal touch by writing the date and the child’s name on the back.
Bat Silhouette Window Clings
Add a touch of Halloween fright to your home with bat silhouettes on the windows. They are easy to make and create a spooky feel.
What you will need:
- Black construction paper
- Scissors
- Pencil
- Tape
Instructions:
- Draw a bat shape on black construction paper.
- Cut out the bat shape.
- Repeat to make many bat silhouettes.
- Attach the bat silhouettes to your windows.
Variation: For a more interesting look, use different bat sizes.
Floating Ghosts: A Fun Illusion
These floating ghosts will impress trick or treaters. Making them is simple, and they create a spooky, magical feeling.
What you will need:
- White balloons
- Cheesecloth or white fabric
- String
- Black marker
Instructions:
- Blow up the white balloons.
- Drape the cheesecloth or white fabric over the balloons.
- Tie the fabric around the balloon’s neck with string.
- Draw spooky ghost faces on the fabric with the black marker.
- Hang your floating ghosts from trees, porch ceilings or doorways.
Tip: For an even better floating effect, use fishing line to hang the ghosts.
Candy Corn Banner
This candy corn banner brings a sweet, cheerful touch. Using the classic Halloween candy, it is an easy craft. Making these homemade decorations is fun for everyone.
What you will need:
- Orange, yellow and white construction paper
- Scissors
- Hole punch
- String or yarn
Instructions:
- Cut triangles from orange, yellow and white paper.
- Arrange the triangles to look like candy corn: white on top, yellow in the middle and orange at the bottom.
- Make holes at the top corners of each candy corn.
- Thread the string or yarn through the holes to make a banner.
- Hang your candy corn banner on a wall, doorway or window.
Decorating for Halloween: Paper Bag Luminaries
Light up your porch or walkway with spooky paper bag luminaries. They are affordable and give off an eerie glow. Making these kids Halloween decorations is easy.
What you will need:
- White paper bags
- Scissors or craft knife
- Sand or small rocks
- Battery operated tea lights
Instructions:
- Draw spooky faces or designs on the paper bags.
- Cut out the designs with scissors or a craft knife.
- Fold the top edge of each bag.
- To weigh each bag down, fill it with sand or small rocks.
- Place a battery operated tea light inside each bag.
- Put the luminaries along your porch, walkway or windowsills.
Homemade Decorations: Window Silhouettes
With spooky window silhouettes, you can create eerie scenes on your windows. They are simple to make and add a dramatic touch to your Halloween display.
What you will need:
- Black construction paper
- Scissors
- Tape
Instructions:
- Draw spooky shapes or scenes on the black paper, like bats, ghosts, witches or haunted houses.
- Cut out the shapes.
- Stick the silhouettes to your windows to create a spooky scene.
Making DIY Halloween decorations kids can help with is a great way to enjoy the Halloween season without spending a fortune. These kids Halloween decorations are cheap and provide a fun activity for everyone. There is a craft for every age and skill level, from spiderwebs to garlands. So, gather your supplies, get creative and transform your home into a haunted dream with these easy homemade decorations. Happy Halloween crafting!